Co-user management
Co-user management
In eAlarm emergency, every registered subscriber can use their personal login (user name) and password to authenticate themselves and log in on the homepage. Their permissions are initially limited to “properties”, i.e. the only data they can view and edit is their personal details such as address, alerting media numbers and addresses, absences and the optional fields.
Important: Simply being able to log in does not make that person a co-user.
In order to become a co-user, i.e. obtain additional permissions in excess of the properties permission, a user login is required, which can be configured in the subscriber zone by setting a login name and password. As soon as a subscriber has a user login, they can be turned into a co-user via the assignment of co-user roles.
Co-user roles
eAlarm emergency has several different co-user roles.
-
Master user: This user has unrestricted permissions and can define the permissions of any other user without any limitations.
-
Alert & Change: This role enables subscribers to edit and delete defined units and sub-units and also to create new units. They can also trigger alerts for these units, review the associated feedback and retrigger an alert, if required.
-
Alert: This role enables subscribers to trigger alerts for the defined units and all sub-units, review the associated feedback and also retrigger an alert, if required.
-
Change: This role enables subscribers to edit and delete defined units and sub-units and also to create new units.
-
Feedback: This role only enables subscribers to review alert feedback. The subscriber does not have any functional permissions, such as for triggering or retriggering alerts or modifying units.
-
Admin: This role enables co-users to do nothing more than view and edit the Admin tab.
With regard to these roles, the master user is only assigned to the customer’s master user and cannot be assigned to other co-users. Several permission roles are therefore available for other co-users. The other roles are local roles, i.e. the permissions are restricted to the groups, sub-groups and subscribers contained therein.
Assigning permissions
Granting permissions to individuals
Rights are granted in an organisational chart / tree view. To go to the permission management function, click on the key icon
 of the corresponding folder.
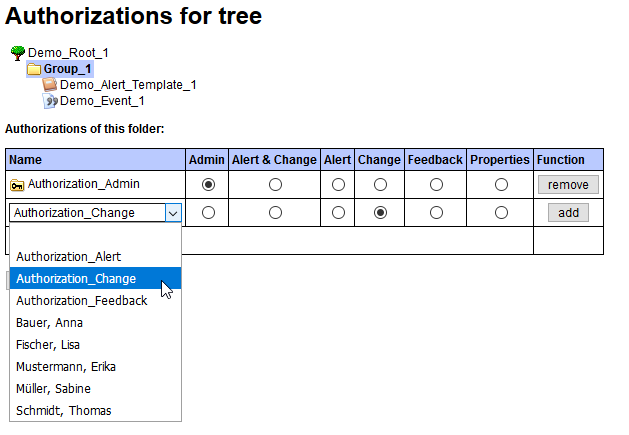
You will see an overview of authorised users here. In the following example, Erika Mustermann has admin rights to the folder “Group_1”.
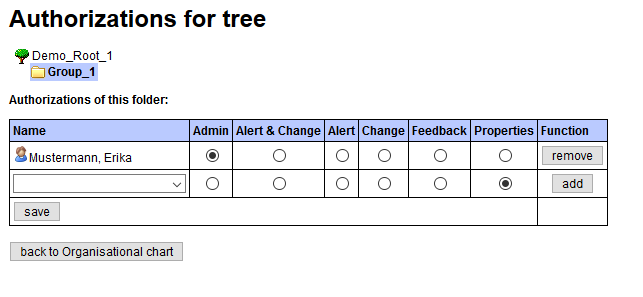
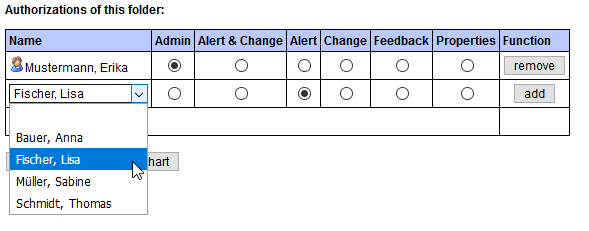
To add a new permission, select the desired person from the drop-down menu and the appropriate permission role. Confirm by clicking on “Add”.
Attention: Assigning co-user roles to individual subscribers has its pitfalls. Imagine that you have assigned permissions to a large number of co-users using the method described above. One and the same co-user might have been assigned specific roles in different trees and groups. If that co-user is then modified, or if their permissions are to be changed, you will need to make the changes in every area where they have been assigned permissions. That can be a cumbersome process and in a larger organisation, it is also easy to lose track of things.
We therefore recommend creating a separate “Co-user management” group, which will enable you to assign permissions to entire groups (instead of individual subscribers) via permissions management. The advantage of this approach is that permission management generally only needs to be configured once. All permission management activities only take place in the “Co-user management” root.
Assigning rights to permission groups (recommended)
Once a co-user is a member of a permission group, they automatically receive all permissions for all defined levels assigned to this permission group. If the co-user is removed from all permission groups, all of the permissions they initially had will also expire, which means they will then only have the “Properties” user login permission.
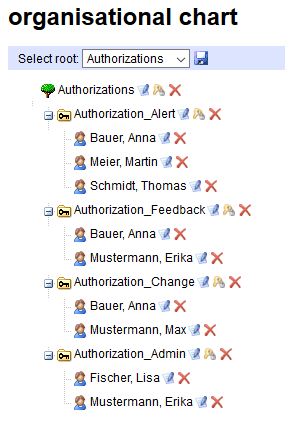
So create a new root and different folders representing the co-user roles. Then assign the subscribers to the corresponding groups.
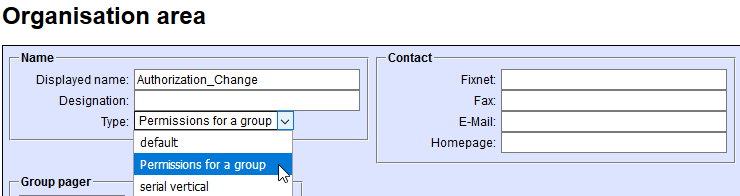
Important: You must first define the folder as a permission group. To do this, click on the edit icon
 and set the type to
“Permissions for a Group” in the organisation area.
and set the type to
“Permissions for a Group” in the organisation area.
Then switch back to the root of your company structure and assign the various folders to the corresponding permission folders. All subscribers who are in the “Authorization_Change” permission group now have permission to change the “Group_1” folder.
Additional permission options can be configured on the “Admin” tab in the “Registry” menu.