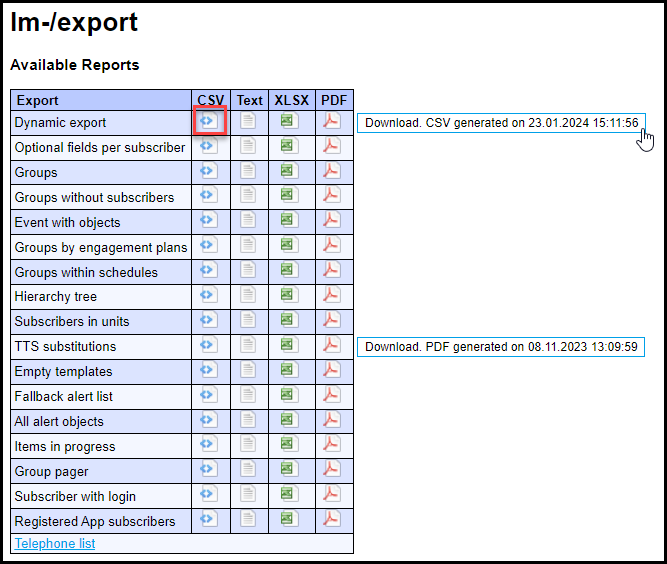
Export
To download a file, click on the corresponding icon in the preferred format and the file will be made available for you on the server. You can now download it. Save the file to a location of your choice. The CSV file can then be opened with a suitable program (on Windows computers, the file type is automatically opened in Excel if this is installed).
Dynamic export
File name: import.csv
Use a dynamic export, for example, to back up data externally. For this, a complete list is compiled of all subscribers and their data fields.

The process lists all standard data and optional data fields. Please note the following conventions:
-
Language: the language is coded as a number in accordance with the following convention: 1 = German, 2 = French, 3 = Italian, 4 = English
-
Pin: is only relevant with the “Subscriber identification” module (optional module). This has to be a 6-digit number that is unique across all of the systems. You can define a personal PIN upon import. If this has already been assigned in eAlarm, it is simply ignored and the data field subsequently remains empty. The field can be left empty if you do not have the “Subscriber identification” module.
-
Login: the login is the key to the participant data set and, at the same time, the user name for joint users in eAlarm. If the field is left empty, the system automatically defines a key. If the participant, however, is also supposed to be able to log in to eAlarm, he can define his user name here. The user name, like the PIN, must be unique across all of the systems. The same also applies here: if the user name is already assigned, the field is ignored upon import. In this case, the system automatically assigns a unique key for the data set.
Note: telephone numbers that are marked as private are identified by the * symbol upon export. In addition, each of the last four digits is replaced with an X, e.g.: 076407XXXX. During the import, the existing telephone numbers are overwritten with new details. Private numbers must therefore be re-entered!
Telephone numbers, which have been selected as the conference medium, are flagged with a hash symbol (#) during the export.
Optional fields per subscriber
File name: import_o.csv
This export only contains the optional data fields. The first two columns list the subscribers’ login and name, followed by the optional data fields as defined in the Admin area.

Attention: The titles in the CSV file must not be changed, otherwise the system can no longer assign the values to the corresponding cells in the database. If any details in the optional fields need to be changed or new details have to be added, please do this in the Admin area.
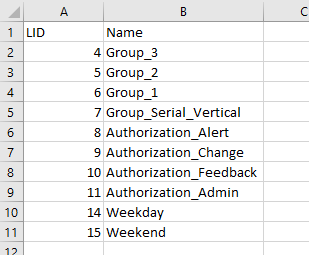
Groups
File name: import_e.csv
This exports all groups along with their corresponding IDs and names. LID is the name of the key for the groups. The key starts at 1 and goes up in increments of 1.
Event with objects
File name: import_ev.csv
Export any events you have created here.

- Root and organisation: Indicates to which root or folders the event is assigned.
- Event code and event name: Event’s name and code as specified
- Description, text, template: The assigned description, text and name of the template
Groups by engagement plans
File name: import_ec.csv
Once you have created schedules in the Admin area and assigned these to groups, you can export the assignments here.
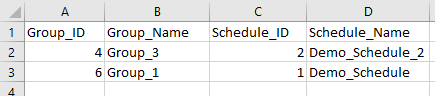
- Group_ID and Group_Name: the keys (Group_ID corresponds to the LID) and name of the corresponding groups
- Schedule_ID and Schedule_Name: number and name of the corresponding plan
Groups within schedules
File name: import_c.csv
If you assigned groups to time controls as described in the section Manage schedules, export those here.
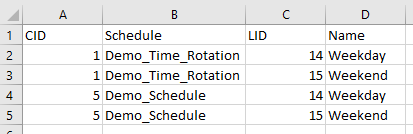
- CID: the key for the time controls. Like the LID, the key starts at 1 and goes up in increments of 1.
- Schedule: the name/designation of the schedule
- LID and name: For the keys and name of the corresponding groups, see Groups
The name is only used to improve the clarity of the export; these values are ignored during the import.
Groups are added to schedules via the LID. As a scheduling option has to be made up of a minimum of two sub-groups, at least two lines always begin with the same CID, namely one for every corresponding group that is then assigned via the LID.
Hierarchy tree
File name: import_h.csv
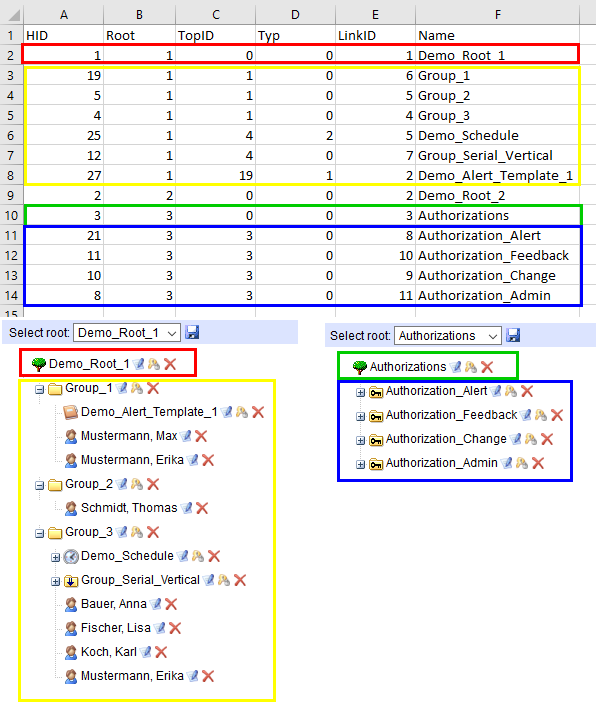
Here you can export the tree structure of your organisation, in other words the roots, folders, time controls, etc., in table format.

- HID: the key for the elements in the tree structure. As with the LID and CID, the key starts with 1 and goes up in increments of 1 (i.e. 1, 2, 3, 4, 5, etc.).
- Root: the table shows the elements of the tree structure sorted by root. The “Root” column numbers these and gives its number to every unassigned element of the root.
- TopID: the HID of the direct predecessor of the unit in the tree, i.e. every unit under which the new one is directly assigned. (The TopID of a root is always 0!)
- Type: describes the unit type: 0 = roots/groups, 1 = alert templates, 2 = time control
- LinkID: the key of the respective units (LID for roots/folders, CID for time controls / alert templates)
Attention: Roots are only created in the system using this file, i.e. the LID of the roots must not yet be occupied by other units (groups). Example: when importing the groups, you have assigned LIDs from 1 to 9; your first root then has LinkID 10, the second 11, etc. – the Name field is only analysed in the case of a root, otherwise its sole purpose is to make the export easier to read.
- Name: unit name
The following offers an example of the data as presented in table format and the corresponding tree structure:
Subscribers in units
File name: import_u.csv
Use this to export the groups to which the individual subscribers are assigned.
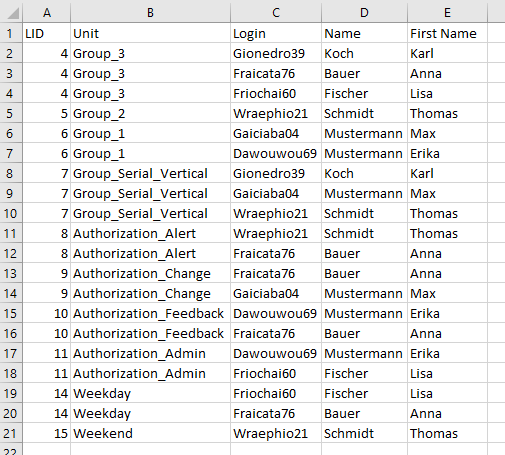
- LID: designates the key of the unit to which the subscriber is to be assigned.
- Login: the subscriber’s key
- Unit / last name / first name: only used here to make the export easier to read – these values are ignored during import.
TTS substitutions
File name : tts.csv
If you have defined “text-to-speech” replacements in the admin area, you can export them in csv format, edit them and import them again.
In the csv file you can insert new entries, change existing ones and delete old ones.
Important! When importing, all data in eAlarm will be overwritten without warning or those that are missing from your list will be deleted.
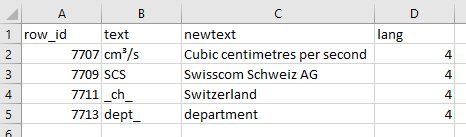
- row_id: The key of the text replacement is automatically assigned by eAlarm and should not be changed in the list. For new entries a “0” must be entered in the row. The unique ID is generated by the import into eAlarm and assigned to the new entry.
- text: Entry of the written text (e.g. an internal abbreviation common to you) which can occur in an alarm message.
- newtext: Entry how the abbreviation must be pronounced when it is received as a voice message.
- lang: Language coding: 1 = German, 2 = French, 3 = Italian, 4 = English
Empty templates
File name: import_lv.csv
This export will give you a list of templates that are empty and should no longer be used as a result, e.g. if the corresponding subscribers have been deleted in the meantime. This is a quickly way of identifying any templates that have become obsolete, particularly if there is a large number of alert templates.
The table lists the type, name, trigger code and description of empty templates so you can delete or edit them.
All alert objects
File name: import_oi.csv
Download a list of all alert objects, i.e. alert templates, conference templates, units and scenarios here.
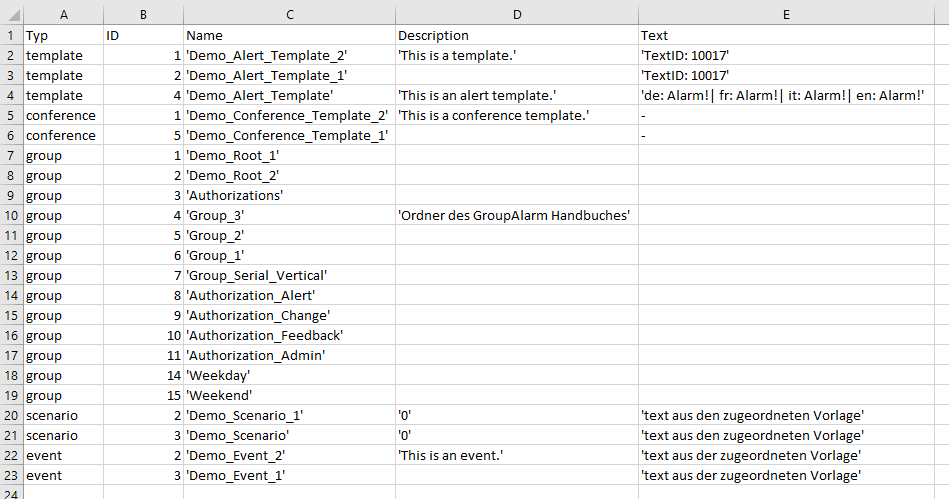
- Type: Object type. template = alert template, conference = conference template, group = roots/folders, scenario = scenario, event = event
- ID: An object’s respective ID (CID, LID or assigned number)
- Name, description: Name of the object and, if available, its description
- Alert text: The alert text or its text code that was specified by default
Telephone list
Here you can create and export a list containing any combination of information. To do so, select the desired data fields in the left-hand column.
They are grouped by colour as default fields, optional fields, units and alert media. Arrange the data fields as desired by using drag and drop to change the order in which they appear.
You can then download the list in PDF, CSV or XLS format  or save the list as a report
  .
.

Saved reports are displayed in a list and can be edited  ,
locked
,
locked  or deleted
 ![]() .
.
